Showing posts with label AutoScript. Show all posts

Wednesday, May 20, 2026

Launch Point Variables in Maximo: Beyond the Attribute Binding

Most Maximo developers are familiar with Launch Point Variables, but in real-world implementations, their usage is often limited to just one binding type: Attribute.

While this works, it overlooks several powerful and lesser-used binding types—particularly SYSPROP—that can significantly simplify scripts, reduce boilerplate code, and improve maintainability.

This article explores LITERAL, MAXVAR, and SYSPROP bindings, explains when to use each, and demonstrates real-world examples.


Why Look Beyond Attribute Binding?

Using only Attribute bindings often leads to:

  • Hard-coded values in scripts
  • Repeated MXServer imports
  • Less readable and harder-to-maintain automation code

Launch Point Variables provide a clean way to externalize values and configuration, making scripts simpler and more flexible.


Overview of Common Launch Point Variable Binding Types

Binding TypeSourceBest Used ForWhy It Matters
LITERALStatic user-defined valueFixed text, flags, small constantsSimple and lightweight
MAXVARMAXVARS tableConfigurable business valuesNo redeployment needed
SYSPROPSystem PropertiesSystem-level configurationEliminates MXServer boilerplate

LITERAL Binding: Simple and Effective

What It Is

A LITERAL binding stores a fixed value entered by the developer.

When to Use

  • Messages and labels
  • Feature flags
  • Constant values reused across scripts

Example

Launch Point Variable

  • Name: WELCOME_MSG
  • Binding Type: LITERAL
  • Value: Welcome to Maximo

Script

service.log("INFO", WELCOME_MSG)

This approach avoids scattering string literals throughout your code and keeps changes centralized.


MAXVAR Binding: Configurable Business Logic

What It Is

The MAXVAR binding retrieves values from the MAXVARS table.

When to Use

  • Thresholds
  • Limits
  • Environment-specific configuration

Example

Launch Point Variable

  • Name: MAX_LOGIN_ATTEMPTS
  • Binding Type: MAXVAR
  • MAXVAR Name: MAXLOGINATTEMPTS

Script

if int(loginAttempts) > int(MAX_LOGIN_ATTEMPTS):
service.log("WARN", "Login attempts exceeded")

Business users or administrators can now change behavior without modifying or redeploying code.


SYSPROP Binding: Clean Access to System Properties

The Common (But Verbose) Approach

Traditionally, developers access system properties like this:

from psdi.server import MXServer

mxServer = MXServer.getMXServer()
timeout = mxServer.getProperty("mxe.int.webclient.timeout")

This works—but adds imports, boilerplate, and visual noise.


The Better Way: SYSPROP Binding

What It Is

SYSPROP allows direct access to System Properties through a Launch Point Variable.

Example

Launch Point Variable

  • Name: WEB_TIMEOUT
  • Binding Type: SYSPROP
  • Property Name: mxe.int.webclient.timeout

Script

timeout = int(WEB_TIMEOUT)

Benefits

  • No MXServer import
  • Cleaner and more readable scripts
  • Easier maintenance and testing

Choosing the Right Binding Type

A simple rule of thumb:

  • LITERAL → Fixed values and messages
  • MAXVAR → Business-configurable parameters
  • SYSPROP → System-level configuration

If a value may change without code changes, avoid hard-coding it.

Saturday, October 4, 2025

Retrieving attachments from S3 Bucket

  • Retrieving a file from doclinks is straightforward. We can pass the doclink URL to ‘File’ object as shown below.
                    file=File("docklink-filepath")
  • However, if the attachments are using an S3 bucket, then we cannot directly fetch ‘File’ object from URL.
  • Few additional steps are required to convert as file before sending or uploading to an API
Steps:
  • Get the byte array of attachment from S3 bucket
  • Create a temporary file in server or pod
  • Create ‘File-output stream’ of the temporary file
  • Write the byte array into the ‘File-output stream’.
  • Upload the ‘File-output stream’ to REST API to send as file attachment.
  • Delete the temporary file

Source Code:

from com.ibm.tivoli.maximo.cos import COSApi
from java.io import File, FileOutputStream, FileInputStream
from java.net  import URL, HttpURLConnection;
from org.apache.http.entity.mime import MultipartEntityBuilder;

cosApi = COSApi(False)
bucketname = service.getProperty(mxe.cosbucketname)
urlString = filePath.split()
fileName = urlString[-1]

#Create Temporary File in Pod
FILEPATH = "root\maximo\temp\fileName.txt";
uploadFile =  File(FILEPATH);
uploadFile.createNewFile();
fos = FileOutputStream(uploadFile);

## Option - 1 

#Get byteArray from S3 Bucket
docBytes=cosApi.getFile(bucketname,fileName)

# Write the Bytes to File Outputstream
fos.write(docBytes);
print(Successfully+  byte inserted);
# Close the file connections
fos.close();

'''
## Option - 2
# Get Input Stream from s3 bucket
fis=cosApi.streamFile(bucketname,fileName)

byteRead=0
#Read byte by byte
while ((byteRead = fis.read()) != -1)
    #Write byte by byte
    fos.write(byteRead)
'''

#Upload File Outputstream to REST API
builder = MultipartEntityBuilder.create();
builder.addBinaryBody(file, uploadFile);
entity = builder.build();

url = URL("https:\\clientdomainhostname\restapi\fileupload");
conn = url.openConnection();
conn.setDoOutput(True);
conn.setRequestMethod(POST);
conn.addRequestProperty(Content-Length, str(entity.getContentLength()));
fos = conn.getOutputStream();
entity.writeTo(fos);
fos.close();
conn.connect();
conn.getInputStream().close();
statusCode = conn.getResponseCode();

#Delete the Temporary File After Upload
uploadFile.delete()

Friday, August 29, 2025

Download and zip multiple attachments - via automation script

  • Maximo attachments can be uploaded and downloaded one at a time.
  • There is no out of the box option to select multiple attachments and download at once.
  • Here is a way to achive this via cusom dialog and automation sctipt.

Add custom dialog:

  • Modify or clone the View attachments dialog
  • Add a checkbox in the dialog to select the documents.

Type: Event

Event: toggleselectrow

  • Add a 'Download' custom action button at the footer of dialog.

Automation Script:
  • Create an action launch point for the button and write below code
from psdi.util import MXApplicationException;
from java.io import FileOutputStream;
from java.io import FileInputStream;
from java.nio.file import Paths;
from java.nio.file import Files;
from java.util.zip import ZipOutputStream;
from java.util.zip import ZipEntry;
from java.io import File;

if launchPoint=='<>':
    session=service.webclientsession()
    docTable=session.getDataBean("<dialog_id>")
    docVector=docTable.getSelection()
    
    filePaths=[]
    for doc in docVector:
        file=doc.getString("URLNAME")
        filePaths.append(file)
    
    downLoadPath="C:\\Users\\Public\\Downloads\\";
    fullPath=downLoadPath+"<FileName>.zip";
    fos = FileOutputStream(fullPath);
    zipOut = ZipOutputStream(fos);
  
    try:
        for filePath in filePaths:
            fileToZip = File(filePath);
            fis = FileInputStream(fileToZip);
            zipEntry = ZipEntry(fileToZip.getName());
            zipOut.putNextEntry(zipEntry);
            bytes = Files.readAllBytes(Paths.get(filePath));
            zipOut.write(bytes, 0, len(bytes));
            fis.close();
        zipOut.close();
        fos.close();
        print ("Compressed the Files to " +str(fullPath));        
																   
    except MXApplicationException as me:
        print ("Maximo Error : " + str(e));
    except Exception as e :
        print ("Error : " + str(e));

Monday, July 15, 2024

Maximo has in-built functionality of processing workflow assignment, updating /creating records using ‘𝐄𝐦𝐚𝐢𝐥 𝐈𝐧𝐭𝐞𝐫𝐚𝐜𝐭𝐢𝐨𝐧’ application. This however, has few drawbacks.
◾ 𝘜𝘴𝘦𝘳 𝘮𝘶𝘴𝘵 𝘮𝘢𝘯𝘶𝘢𝘭𝘭𝘺 𝘵𝘺𝘱𝘦 𝘵𝘩𝘦 𝘙𝘦𝘴𝘱𝘰𝘯𝘴𝘦 𝘤𝘰𝘥𝘦, 𝘵𝘺𝘱𝘪𝘤𝘢𝘭𝘭𝘺 1 𝘰𝘳 2, 𝘵𝘩𝘦𝘯 𝘴𝘦𝘯𝘥 𝘦𝘮𝘢𝘪𝘭 𝘳𝘦𝘴𝘱𝘰𝘯𝘴𝘦. 𝘐𝘧 𝘶𝘴𝘦𝘳 𝘮𝘪𝘴𝘵𝘺𝘱𝘦 𝘰𝘳 𝘢𝘥𝘥 𝘦𝘹𝘵𝘳𝘢 𝘴𝘱𝘢𝘤𝘦 𝘸𝘩𝘪𝘭𝘦 𝘴𝘦𝘯𝘥𝘪𝘯𝘨, 𝘪𝘵 𝘮𝘢𝘺 𝘧𝘢𝘪𝘭.
◾ 𝘈𝘭𝘴𝘰, 𝘵𝘩𝘦 𝘦𝘮𝘢𝘪𝘭 𝘸𝘪𝘭𝘭 𝘩𝘢𝘷𝘦 𝘥𝘦𝘵𝘢𝘪𝘭𝘴 𝘭𝘪𝘬𝘦 𝘓𝘚𝘕𝘙𝘐𝘋, 𝘞𝘍𝘈𝘚𝘚𝘐𝘎𝘕𝘔𝘌𝘕𝘛𝘐𝘋 𝘦𝘵𝘤. 𝘸𝘩𝘪𝘤𝘩 𝘮𝘢𝘺 𝘯𝘰𝘵 𝘣𝘦 𝘱𝘳𝘦𝘧𝘦𝘳𝘢𝘣𝘭𝘦 𝘣𝘺 𝘴𝘰𝘮𝘦 𝘤𝘭𝘪𝘦𝘯𝘵𝘴.

There is an 𝐚𝐥𝐭𝐞𝐫𝐧𝐚𝐭𝐞 way to achieve this via automation script as below. 
1. When a workflow is assigned to specific User/Role, Maximo will send Email containing two 𝐡𝐲𝐩𝐞𝐫𝐥𝐢𝐧𝐤𝐬 to 𝐀𝐩𝐩𝐫𝐨𝐯𝐞/𝐑𝐞𝐣𝐞𝐜𝐭 the assignment and other details.
2. On 𝐜𝐥𝐢𝐜𝐤 of 𝐡𝐲𝐩𝐞𝐫𝐥𝐢𝐧𝐤, will create 𝐧𝐞𝐰 𝐄𝐦𝐚𝐢𝐥 with ‘𝐖𝐨𝐫𝐤𝐟𝐥𝐨𝐰 𝐀𝐬𝐬𝐢𝐠𝐧𝐦𝐞𝐧𝐭 𝐈𝐃 𝐚𝐧𝐝 𝐑𝐞𝐬𝐩𝐨𝐧𝐬𝐞 𝐜𝐨𝐝𝐞 (𝑨𝒑𝒑𝒓𝒐𝒗𝒆 𝒐𝒓 𝑹𝒆𝒋𝒆𝒄𝒕)’ 𝐢𝐧 𝐒𝐮𝐛𝐣𝐞𝐜𝐭, then user only need to 𝐜𝐥𝐢𝐜𝐤 ‘𝑺𝒆𝒏𝒅’.
This way,
✔𝘜𝘴𝘦𝘳 𝘥𝘰 𝘯𝘰𝘵 𝘯𝘦𝘦𝘥 𝘵𝘰 𝘵𝘺𝘱𝘦 𝘢𝘯𝘺 𝘳𝘦𝘴𝘱𝘰𝘯𝘴𝘦 𝘤𝘰𝘥𝘦 𝘖𝘙 𝘴𝘦𝘦 𝘢𝘯𝘺 𝘵𝘦𝘤𝘩𝘯𝘪𝘤𝘢𝘭 𝘥𝘢𝘵𝘢 𝘪𝘯 𝘐𝘯𝘣𝘰𝘶𝘯𝘥 𝘌𝘮𝘢𝘪𝘭. 
✔ 𝘕𝘰 𝘯𝘦𝘦𝘥 𝘵𝘰 𝘤𝘰𝘯𝘧𝘪𝘨𝘶𝘳𝘦 𝘌𝘴𝘤𝘢𝘭𝘢𝘵𝘪𝘰𝘯 𝘵𝘰 𝘴𝘦𝘯𝘥 𝘐𝘯𝘵𝘦𝘳𝘢𝘤𝘵𝘪𝘷𝘦 𝘰𝘶𝘵𝘣𝘰𝘶𝘯𝘥 𝘌𝘮𝘢𝘪𝘭𝘴.

Click here for more details.

Sunday, June 9, 2024


  SQL Query to get the Auto Script Launch Point Events

  • Maximo automation script has different launch points such as Attribute, Object, Action etc. The values like 'Objectname', 'Attributename', 'Launch Point Type' etc. can be viewed via both Maximo application and back end 
  • But Object events ('Before Save' After Save' with combination on 'Add/Update/Delete') and Attribute events ('Validate','Run Action' etc.) are stored as number format in the 'OBJECTEVENT' column of SCRIPTLAUNCHPOINT table. 
  • This number follow certain sequence and multiplication of factor specific to launch point type. It is quite complex task to identify these values from back end. 
  • Here is a simple query to get these values via back end. This is useful for Object and Attribute launch point events.    
SELECT OBJECTEVENT,
CASE 
WHEN LAUNCHPOINTTYPE ='OBJECT' THEN 
	CASE 
	WHEN OBJECTEVENT=1 THEN 'Initialize' 
	WHEN OBJECTEVENT BETWEEN 2 AND 14 THEN
		CASE 
		WHEN OBJECTEVENT/2=1 THEN 'BeforeSave - Add' 
        WHEN OBJECTEVENT/2=2 THEN 'BeforeSave - Update' 
        WHEN OBJECTEVENT/2=3 THEN 'BeforeSave - Add+Update'
		WHEN OBJECTEVENT/2=4 THEN 'BeforeSave - Delete' 
        WHEN OBJECTEVENT/2=5 THEN 'BeforeSave - Add+Delete'
		WHEN OBJECTEVENT/2=6 THEN 'BeforeSave - Update+Delete' 
        WHEN OBJECTEVENT/2=7 THEN 'BeforeSave - Add+Update+Delete'
		END
	WHEN OBJECTEVENT BETWEEN 16 AND 112 THEN
		CASE 
		WHEN OBJECTEVENT/16=1 THEN 'After Save - Add' 
        WHEN OBJECTEVENT/16=2 THEN 'After Save - Update' 
        WHEN OBJECTEVENT/16=3 THEN 'After Save - Add+Update'
		WHEN OBJECTEVENT/16=4 THEN 'After Save - Delete' 
        WHEN OBJECTEVENT/16=5 THEN 'After Save - Add+Delete'
		WHEN OBJECTEVENT/16=6 THEN 'After Save - Update+Delete' 
        WHEN OBJECTEVENT/16=7 THEN 'After Save - Add+Update+Delete'		
		END
	WHEN OBJECTEVENT BETWEEN 128 AND 896 THEN 
		CASE 
		WHEN OBJECTEVENT/128=1 THEN 'After Commit - Add' 
        WHEN OBJECTEVENT/128=2 THEN 'After Commit - Update' 
        WHEN OBJECTEVENT/128=3 THEN 'After Commit - Add+Update'
		WHEN OBJECTEVENT/128=4 THEN 'After Commit - Delete' 
        WHEN OBJECTEVENT/128=5 THEN 'After Commit - Add+Delete'
		WHEN OBJECTEVENT/128=6 THEN 'After Commit - Update+Delete' 
        WHEN OBJECTEVENT/128=7 THEN 'After Commit - Add+Update+Delete'		
		END
	END
WHEN LAUNCHPOINTTYPE='ATTRIBUTE' THEN 
	CASE 
	WHEN OBJECTEVENT=0 THEN 'Validate'
    WHEN OBJECTEVENT=1 THEN 'Run action' 
    WHEN OBJECTEVENT=2 THEN 'Initialize' 
    WHEN OBJECTEVENT=8 THEN 'Initialize Access Restriction'
	WHEN OBJECTEVENT=64 THEN 'Retrieve list'
	END
WHEN OBJECTEVENT IS NULL THEN 'Not Applicable'
END as EventType,* FROM SCRIPTLAUNCHPOINT

The SQL Query is based logic as explained below .
Object event types can be assigned a factor based on the range of 'Object event' value.
TypeRange of valuesFactor
Before Save  >=2<=142
After Save >=16<=11216
After Commit >=128<=896128

Apply the below Formula and get the results specific Sub-event type.

            Value = ObjectEvent / EventFactor

ObjectEvent = SCRIPTLAUNCHPOINT.OBJECTEVENT
EventFactor = Value from above table. (2, 16, 128)

Now, map the output of above formula to 'Sub-Event type' such as Add/Update/Add+Update etc. to get the final result.

EventValue
Add    1
Update    2
Add+Update    3
Delete    4
Add+Delete    5
Update+Delete    6
Add+Update+Delete    7
    

Monday, May 13, 2024

Automate Email attachment specific to a record

Automate Email attachment specific to a record
  Maximo can send email communication with attachments, in following ways.

  1. By adding a default attachment(s) to a communication template and wherever this template is used, it will send the associated files as well. But this is set to a default document(s) and cannot be specific to record.
  2. Other option is using 'Create Communication' option from an application, where user can manually add attachments and send.

This process of sending document specific to a record (like Workorder, PO etc.) OR a Person (like an approver in workflow) can be automated using script.


Create an Action Launch Point, add Script, choose script launguage as 'python/jython' and write code as explained below .

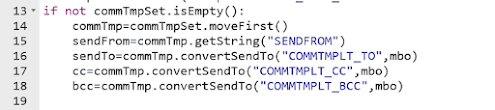
  • Import the MXServer and SqlFormat APIs; Use MXServer to get the communication template MboSet


    • Get the CommTemplate Mbo from MboSet;
      Use CommTemplate.convertSendTo() method to get the email IDs of sendTo, cc,bcc etc; Usually, these details are retrieved from a Role associated to Communication template or Workflow.

    • Use SqlFormat.resolvecontent() method to replace the values of binding variables in subject, message.
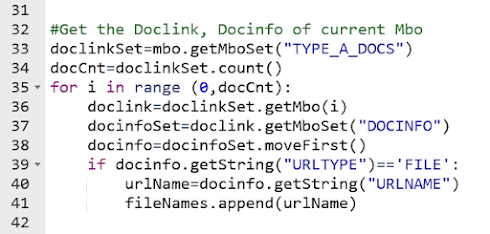
  • We can use custom relationship to get a specific type of documents. (Example: DOCTYPE='TYPE-A' and ownerid=:workorderid and ownertable='WORKORDER').
    Then, use the default relationship from DOCLINKS to DOCINFO to retrieve document details.(URLNAME, URLTYPE)
    Add the document path values (DOCINFO.URLNAME) to a string array. []


  • Finally, invoke the MXServer.SendEmail() method with sender, subject, message and attachment details. MXServer.sendEMail(sendTo, cc, bcc, sendFrom, subject, message, replyTo, fileNames, urlNames)


    Source Code:

Friday, April 12, 2024

Get count of JMS Queue Messages using Automation Script

  • Maximo use JMS queues for inbound, outbound data processing. These messages and message count can be manually viewed from External System application.
  • Here is a simple automation script to get the count of Messages in JMS Queues. It  can be used in Action Launch point to view message count in 'Action button' of an application  OR in an Escalation to send details via Email.

Script:

from psdi.iface.jms import JMSQueueBrowser
from psdi.iface.jms import MaxQueueCache
from psdi.iface.jms import QueueConfig
from psdi.iface.jms import JMSData

qbrowser = None
queueName = "jms/maximo/int/queues/cqin"
selector = "SENDER='ABC'"
config = MaxQueueCache.getInstance().getQueueConfig(queueName);
connectionFactory = config.getConfactName();
env = config.getEnv()
qbrowser = JMSQueueBrowser(queueName, connectionFactory, selector, env);
qList = qbrowser.getAllMessages();
qCount=len(qList)

#raise TypeError("Messages Count - "+str(qCount))
print '-- Number of Messages in the Queue : ' +str(qCount)


Script Variables:
queueName = path of the JMS queue as configured in Maximo


Launch Point Variables in Maximo: Beyond the Attribute Binding

Most Maximo developers are familiar with Launch Point Variables , but in real-world implementations, their usage is often limited to just on...